I thought about writing a guide to explain how I migrated my blog from Blogger to Jekyll, however, it became too long, so instead here is a timeline and if you want to know more about a section, please comment at the bottom.
- Forked Jekyll-Now into my own GitHub Repo
- Renamed the repo to GitHubUsername.github.io, this is how GitHub pages works
- Cloned that repo to my local machine
- Decided I was going to use Atom as my Editor
- Changed basic settings in the _config.yml file, such as site name and social media links
- Pushed to GitHub and checked my site was working
- Made a plan about which pages I was going to migrate first
- Refreshed my Markdown knowledge
- Familiarised myself with Front Matter
- Started with my events page, and had to read about Liquid, Templates and Filters
- Got Jekyll up and running locally instead of pushing to GitHub each time I wanted to check something
- Even though it’s quite simple I also took a refresher on YAML
- Worked out how to embed things in pages such as YouTube and Gist posts.
- Exported all my posts from Blogger
- Used a really helpful tool from Jekyll to convert the Blogger export to individual markdown files for each post
- Explored the results from the above tool, to under the Front Matter automatically added
- Mirrored the format of blog URLs from Blogger so I have no Google/Bing dead links and negative points for broken links
- Started working on each post to convert the HTML to Markdown, a combination of manually checking and using this awesome converter
- Went through each post adding categories and tags to improve searching and to build the categories and tags pages
- Created the about me page
- Asked some friends what they thought of my new design, the awesome Ash Coleman got her designer friend to provide me awesome feedback!
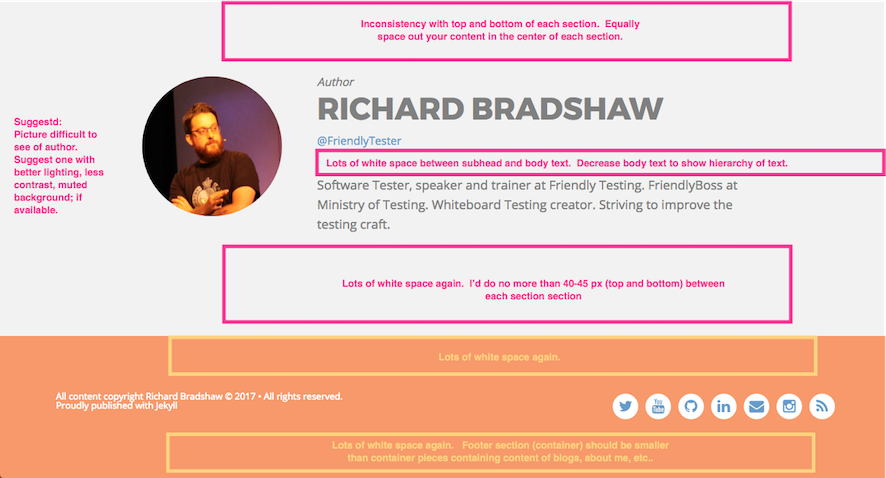
- Action all the feedback I got, which was a deep dive into CSS. Magic stuff. I utilised W3CSchools a lot!
- Re-structured the details about each blog post and added the read time
- Added comments to my blog using Disqus, I actually copied this from Viv’s repo
- Got the awesome Thomas Harvey to create me a Friendly Tester logo in the same style as Friendly Testing
- Checked that my blog was providing all the SEO tags
- Changed my hosting DNS to point to GitHub pages
- Then realised GitHub Pages don’t offer HTTPS with custom domains, so discovered I could use Cloudflare for free!
- Shared it with the community!
- Wrote about the what I learnt and why I chose Jekyll
I reckon that’s that. As mentioned at the start if you’re going through the same process and have some questions on specific sections, ask me in the comments.